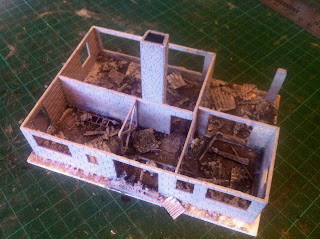
Here is the second part of my project to turn a HO scale railway building into a useful bit of 15mm wargaming terrain.
In the part one, I added some raised internal floors to disguise that the building is in a larger scale than the miniatures I'm going to use it with. On the outside of the building, I added steps up to each entrance to complete this illusion. The original kit was a 'building under construction' so it lacked windows and doors. I couldn't be bothered to add window frames (perhaps I will on the second one that I have stashed in my loft) but I thought that it needed doors at least. I fashioned one out of two pieces of embossed Slater's Plastikard glued back-to-back, and a second door, meant to be either burned or broken down, from a couple of plastic off-cuts.
At this point I blacked out the chimney and fire place, as well as a couple of areas I thought I might have trouble getting to when I started painting. I also glued on a few off-cuts of corrugated card and slivers of plastic card. You can see the broken door and one set of steps in the bottom left of the picture below and the intact door in the top right.
The house needed filling up with rubble so I mixed various grades of sand and Woodland Scenics ballast with more card, plastic off-cuts and a lot of PVA glue. I hate wasting things, especially materials that can't be easily recycled, so I keep a small container full of the tiny bits and pieces of the waste that terrain-making projects usually generate. They come in handy for ruined buildings like this!
With a cheap and nasty Poundland brush that I keep for these occasions, I slapped on the rubble mix and pushed it into the corners. I dropped in a few more larger off-cuts and bits of ballast and sprinkled some fine sand here and there.
Here is the house, filled up with rubble:
The glue takes a while to harden so I usually do this kind of thing late in the day so it hardens overnight. I weigh down the building in case the glue contracts while hardening and causes the base to bow. I have no idea if this would actually happen, but I don't want to risk it! Here are a few angles of the house from the following morning:
And another image, showing the partition walls and a some bits of a ladder that came with the original kit. I put the partitions back in to divide the building into smaller rooms.
As you can see, the rubble and a strategically placed internal door hide the gap between the two sections of flooring. I also used the rubble to hide the places where I hadn't quite managed to fit the floor flush to the wall.
So, finally, I started to paint the rooms! I first painted the floors and the lower part of the walls black. I then painted the interior walls with a mid-grey. This particular grey craft paint did not provide great coverage, but it wasn't a problem because it allowed some of the cream-coloured plastic and the black to show through, adding variety and random scruffiness to the brickwork. I painted the corrugated card with a more solid coat of the same grey and then with silver. After that, I drybrushed the floor with the mid-grey and a light grey.
The next stage was to wash the floors and walls with thinned paint. I used my perennial favourite, FolkArt's Dark Grey craft paint. It is somehow brown and grey at the same time, and makes everything look lovely and grimy. When the Dark Grey was dry, I added a second wash of it here and there, plus washes of raw umber and black in places, particularly in the corners and around larger bits of rubble to provide definition. The pictures below show the end result. They aren't very good shots, alas, but they're all that I have of this stage because I moved on to the next one before I checked the photos I took.
In part three, I start work on the roof. I'll post it in a few days...


Comments
Post a Comment