Here’s another set of terrain pieces, forming a ruined arcade, for my Mars project. Or maybe it’s Yuggoth. All I know is that there is sand. Lots of sand.
I started out with twelve wedding cake pillars. This turned out to be the most troublesome part of the project as there were none to be found in the two towns I tried. Eventually, I found some in my not-so-local hobbycraft:
I started out with twelve wedding cake pillars. This turned out to be the most troublesome part of the project as there were none to be found in the two towns I tried. Eventually, I found some in my not-so-local hobbycraft:
They weren't quite what I had in mind because I didn’t picture them tapering at one end, but the shape has grown on me since the purchase and they seem to fit quite well with the buildings I’ve already made (here, here and here).
As you can see below, a low-relief design runs down the length of the pillars:
I sliced off this design with a Stanley knife, then cut each pillar in half and filed away the loose shards of plastic. I cut a few pillars twice to make some small pieces that I could put on the ground. At this stage I still wasn’t sure if I even liked the shape of the pillars, so I couldn’t be bothered to soften the edges with a file to match the edges of my existing buildings. While it didn’t really spoil the end result, that is something I still regret slightly!
I kept the tops of the pillars with a view to doing something with them another time. The next stage was to stick the pillars to strips of vinyl floor tile with some epoxy resin. The bases of the pillars are not a uniform level so the resin blobs give the pillars something to sink into and improves the join.
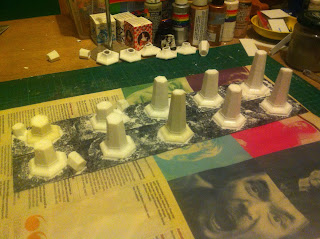
When the resin had cured, I stuffed each pillar with a lightweight, ready-mixed filler from Wilkinsons. I also added some filler to the bases, to hide the gaps between the pillars and the vinyl strips:
The next couple of stages were to glue sand to the pillars and base, leave them to dry overnight, and then seal with a wash of PVA thinned with water:
The sand was patchy in a few places, where I hadn’t painted the plastic properly with glue:
I retouched two larger areas before sealing, but the remaining patches weren’t really noticeable after applying a black undercoat:
At this stage, I'll introduce a companion terrain piece: a plasticard sheet embossed with paving, backed with a second sheet of plastic to stiffen it and raise it to the height to the vinyl, then sprinkled with sand and sealed. After sealing, I undercoated the paving with black and drybrushed it with the same grey I used for my other buildings:
I also painted the pillars in the same way as the other buildings, drybrushing with grey and then applying a wash of thinned black. After this, I added some rocks, rubble and more sand:
After sealing the rubble with more thinned PVA, I undercoated the bases...
...then drybrushed them with my usual desert colours; fawn, a light sandstone, and light grey:
This amount of drybrushing seems to destroy my brushes quite quickly! The day before I took this photo, the brush on the left had bristles the same length as the brush on the right:
I finished the terrain pieces with a final wash of thinned Folk Art Dark Grey over the bases. Here are the end results...
Two short pillar sections:
The long pillar sections:
The paving sections:
And everything in position as I had first imagined it:
I’ve mentioned before that I plan to make a large temple as a centrepiece. This arcade is the first step toward that. Until then, I think the arcade works well enough with my existing buildings:
The second step is to eat my way through one last tub of coleslaw...


Comments
Post a Comment